Category: A4architect

a4architect posts

  • Setting out a Building.

    Setting out a Building.

    Procedures.

    1.Once the foundation is excavated, the formwork supporting the sides of foundation is marked as per the dimensions shown in the architectural foundation floor plan.


    2.Nails are nailed on the formwork, measured out exactly as shown in the drawing.


    1. Nylon strings are tied from one end to the extreme opposite for all sides of the foundation.


    The nails on the formwork should be in the same exact dimensions as in the drawings. The wall thickness dimensions should also be captured. This is a very critical dimensioning since the rest of the walls after the ground floor slab is done will be dimensioned the same way. Wall structural loading should be very accurate , where the top floor wallings sit exactly on top of the foundation wallings as marked in the seting out.


    1. In the drawings above, notice the wall thickness marked 0.150, meaning the wall is 150mm thick. This dimension should be captured in the setting out where the nails supporting the nylon strings on the timber formwork are located.


    Procedure for transferring measurements.


    1.Using the architectural drawing, starting from one end of the edge, note the wall thickness and mark it on the wooden support formwork erected at the edge of the foundation.


    1. Mark it using nails, from which later on the nylon strings will support from.


    3.Continue noting the dimensions from the drawings and marking them out progressively from one end towards the farthest end.


    1. Tie the nylon string to the nails and using a builders square to ensure the strings are at 90 degrees to the edge, pull the strings to the opposite side and after positioning it, nail to the timber formwork.


    5.Repeat this procedure for all the sides and countercheck again to ensure all dimensions are matching as in the drawings.


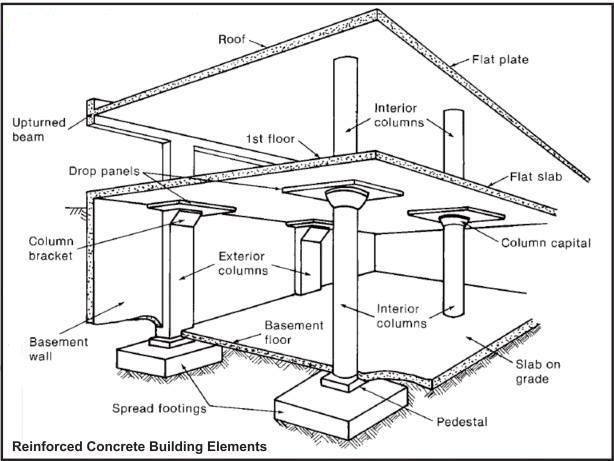
    6.Using the structural engineer’s drawings, use same procedure to set out for column foundation bases.

    See the structural engineering drawing above.


    1. Measure out form one end and take the dimensions in the drawings to position them in the timber formwork and mark them using mails and nylon rope as in the procedures described above.


    1. Using a builders square, strings are re adjusted to ensure they are 90 degrees to the formwork.


    Care should be taken to ensure that the strings attached to the wooden formwork are protruding at 90 degrees angle from the timber formwork towards the opposite end.


    1. The longer type of builders square , with the short end held on the wooden edge, and the long edge along the string, is best placed to ensure that the string protrudes at 90 degrees.


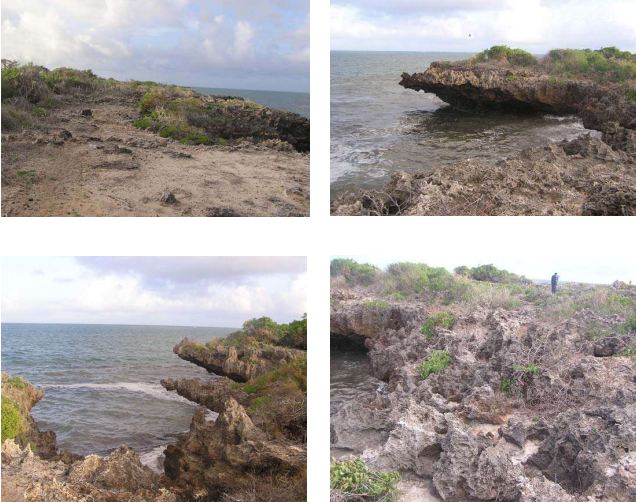
    3 4 5 method of triangulation.


    Check above images to see a demonstration of the 3 4 5 method used to recheck if the corners are at right angles together.


    1. Using one end of a corner where the 2 end walls meet, measure out 3 meters from one side and mark on the string.


    1. Measure out 4 meters on the other right angle side and mark on the string.


    1. The diagonal distance between the 2 points should be 5 meters.


    1. If the distance is not 5 meters, this means the corners are not at right angles and the strings will need to be adjusted to be 90 degrees protruding from one edge.


    Diagonals method for checking right angles.


    Procedure.


    1. Measure out the distance diagonally from one end of a corner to the other.
    2. Measurue out the diagonal distance of the opposite side.
    3. These 2 measurements should be the same.
    4. If the distances are not equal, this means there is a problem with the overall measurement and setting out so the procedures ofr setting out should be repeated again until the diagonal measurement s are all equal.


    On the foundation corners, the diagonal ends are measured to ensure that they are of the same size, meaning the foundation is rectangular or square, not hexagonal.


    Also, on the edge of the foundation, use of the 3 4 5 method can be done to quickly confirm that the corners are at 90 degrees.


    Marking the wall trenches.


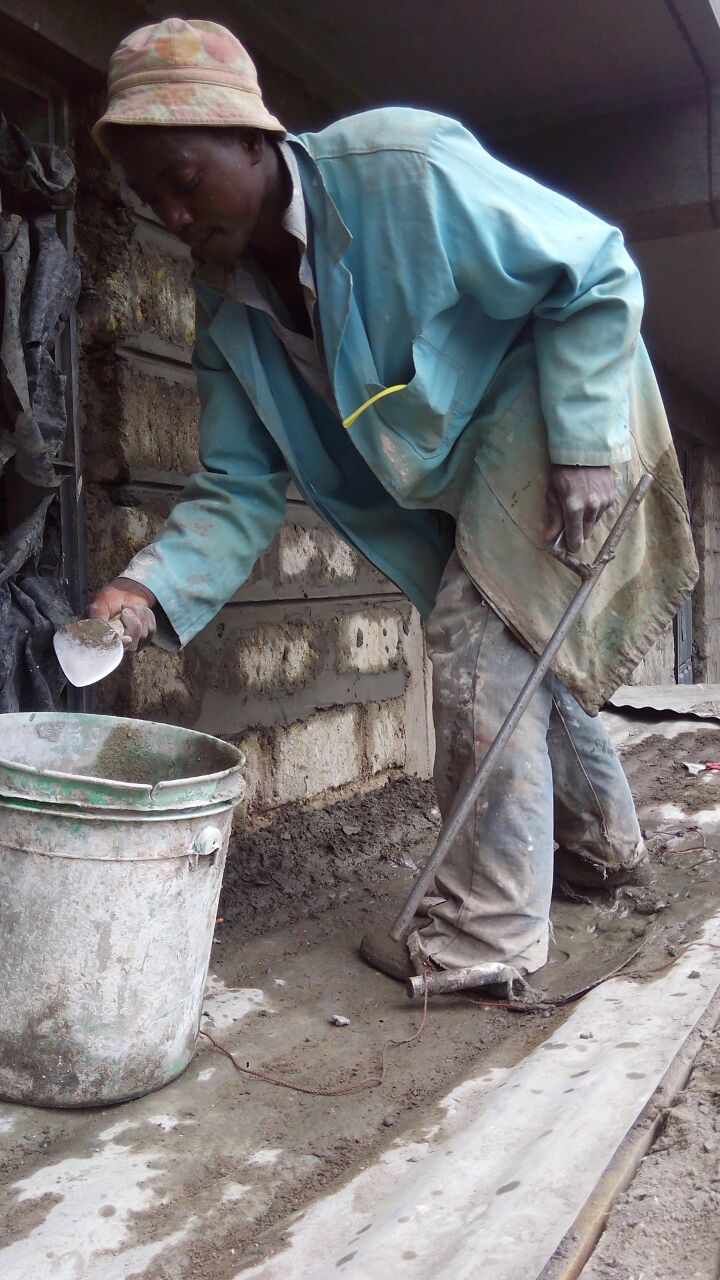
    Using lime powder, mark the foundation walling trenches then start excavation as per structural engineer’s specifications.

    Screeding should then follow suit in readiness for foundation walling and beams.


    Architect Francis Gichuhi Kamau.

  • Importance of always wear protective gear and use protective equipment through out the site.

    Importance of always wear protective gear and use protective equipment through out the site.


    Setting out foundations are amongst the 1st tasks to be carried out in a building construction works. This marks a good start for masons to begin getting accustomed to any new protective gear.


    Types of protective gear.


    1. Reflective vest.

    The reflective yellow or orange vests increase visibility, hence enabling more safety.


    The gloves prevent masons from being burnt by cement mortar since its very reactive to bare skin.


    The boots prevent injury from nails and other tripping objects.


    The overalls prevent dirt and other loose clothing from getting entangled by machine moving parts.


    Helmets prevent injury from flying objects from the upper levels.


    County Government Health department  bye laws.


    The county government through its health department outlaws any worker/mason from working at a site without proper protective clothing.

    Any worker found without this gear by the county inspection team is liable to be arrested and fined in a court of law.


    Demonstration of actual setting out.


    Procedure.


    1. Timber formwork is installed at the foundation edges.
    2. One mason will read out the dimensions and mark them on one side of the edge.
    3. Mason will Tie a nylon string.
    4. Another mason will pull the sting all the way to the opposite side.
    5. The mason will use a long type builders square to position a right angles protrusion of the string from his end.
    6. The other mason on the opposite end will move and adjust the sting as per the instructions of the mason measuring the 90 degrees angle.
    7. When the mason measuring the 90 degrees angle is satisfied of the right angles, he will ask the other mason on the opposite side to tie the string on the timber formwork and then nail a nail on the timber formwork .
    8. Eventually mason will tie the string to the nail in a taut firm manner.


    1. This process is repeated for all the dimensions shown on the architectural drawings and structural drawings.

    Architect Francis Gichuhi Kamau

  • Tools and Equipment used in Setting out a Building.

    Tools and Equipment used in Setting out a Building.


    1.Theodolites.

    For large complex buildings, theodolites, survey equipment’s, are used to mark out building external wall extents.


    1. Measuring tape

    For small scale types of construction, use of long type builder’s square , steel measuring tape are sufficient to demarcate the building external wall extents and internal wall partitioning.


    For shorter distances, the steel tape is most appropriate, eg distances between two rooms, thickness of wall while setting out etc.

    For larger distances, eg perimeter wall measurement, hexagonal check, the flexible type is most appropriate.


    3.Spirit Level

    Spirit level is used to ensure that the nylon strings used in setting out are horizontal.


    4.Nylon String


    Nylon strings are used to demarcate the wall thickness and building extent.


    5.Lime Powder

    White lime powder is used to mark the foundation walling and column footing positions for further excavation till rock or stable ground.


    White lime used to measure out the extents of the building footprint in readiness for excavation.


    Notice the wooden formwork that will be used to support the nylon strings to enable setting out.


    Notice the effectiveness of white lime powder in effectively marking out foundation dimensions for setting out buildings.


    Architect Francis Gichuhi Kamau

  • How to commence pointing of masonry walls from start to finish.

    How to commence pointing of masonry walls from start to finish.


    1.The beginning involves use of masons hammer and chisel to shape out the stone joints to an even line.

    2.Water is poured on the stones to enable smooth binding between existing stone and new mortar.


    1. The gaps in between are deepened and widened using a masons chisel.


    1. Cement sand mortar is mixed and plastered on the widened joints.

    1. Using a trowel, the mason then scoops the motar and pastes it in between the joint through out the line.
    2. A nylon string is then stuck from one end.
    3. The string is leveled out using spirit level to ensure its horizontal the nstuck on the other end.
    4. Using the trowel, the mason press the string onto the fresh motar to leave an indented marking line.


    1. The string is then removed and the mason now uses the pointing tool to press into the fresh mortar to make the pointing line.


    1. The mason does this repeatedly, following the embedded line, and using the trowel to remove excess mortar until a horizontal line is achieved.


    1. The same is done for vertical lines. For uneven lines eg when using mazeras or slate stone, a shorter pointing tool is used.

    For cobble stone pointing, use of shorter pointing tools is needed.


    For zero jointed masonry walls, a very thin pointing tool is used to achieve this.


    The end result for zero jointed style is a wall that looks smooth and jointless.


  • How to identify the difference between architectural and structural engineering drawings.

    How to identify the difference between architectural and structural engineering drawings.


    Structural drawing sample


    Architectural drawing sample


    Visual identification.


    Structural engineering drawings are easily identified from their mostly line work drawings. Architectural drawings have other features such as room furniture, bathroom and kitchen fixtures in them.


    Technical identification.


    Structural engineering drawings also have letterings describing the type of reinforcement steel eg y8, y10,y12, y16,y20.

    Architectural drawings have lettering describing the spaces eg living room, bedroom, kitchen etc.


    Dimensions


    Both architectural and structural drawings are dimensioned in mili meters. 1 meter is dimensioned as 1000.

    Masonry walls are mostly 6 or 9 inch wide, dimensioned as 150 or 200mm on the drawings.

    The walls are usually cross hatched to enable them be more visible. This is clearly seen in architectural drawings.


    Working drawings.


    These are both architectural and structural drawings that contain detailed dimensions to enable the mason read out and convey the dimensions on the ground to a construction project.

    These are different from presentation drawings which do not contain detailed dimensions and which are used for purposes of being consumed by lay people with little construction technology knowledge e.g. potential property buyers, land owners etc.

    Working drawings are meant to be used by technical personal such as masons so as to be read and interpreted onto the ground.


    Architect Francis Gichuhi kamau.

  • County Approval of Building Plan in Kenya. Room size regulations

    County Approval of Building Plan in Kenya. Room size regulations.

    Rules and regulations that govern room sizes.

    Room sizes are governed by the Kenya Building code and subsequent bye laws passed by the County Government assembly MCAs into laws.

    The Kenya Building code describes the minimum dimensions and sizes for habitable rooms in residential buildings, class rooms, ware houses etc.

    Size rooms in rental apartments.

    For rental apartments, room sizes are determined by the minimum sizes set out in the building code. Once the architect completes designing the building, he submits the drawings to the County Government Planning department for them to see if the building meets the minimum room size criteria set out in the bye laws. If the building meets the guidelines, an approval to construct is issued.

      Number of units per apartment

    The number of units in an apartment is also designed by the architect and the drawings submitted for approval to the relevant County Planning department. Each County has its own unique sets of bye laws that they use to determine if the number of units within a given plot size is adequate. In town centers, more units per plot size is allowed. In areas further away from commercial town centers, the areas are zoned for 1 or a few residential units per the plot size. For example, in Karen, only 1 residential dwelling is allowed for a 0.5 acre plot. In Kilimani or Upper Hill areas, the same half are plot can carry up to 100 housing units, stacked up vertically in 10 to 20 floor levels.

    Distance from one apartment to the other.

    The Kenya Building Code and County bye laws determine distance from one window of an apartment to another. This distance is needed to allow for privacy and also to let in natural light and ventilation. This is also important in preventing spread of fire in case the building catches fire.

       Shared infrastructure such as stairs, lighting in shared walkways etc

    County planning bye laws, Building Code, and the County Planner discretion is what guides upon these shared infrastructure.

    For Counties such as Nairobi where the Planning departments have Fire Officers, there is a further request for fire escape staircases to be located at the furthest point from the main stair case. This is to ensure that in case of fire, occupants will be able to get to safety easily.

    For high end apartments, the developer is able to reduce as much as possible the shared infrastructure such as stairways so as to make it more comfortable for the occupants. This will result in a higher rent, hence most apartments in High cost areas such as Upperhill, Kilimani, Kileleshwa are designed this way and the developers recoup through higher rents.

      Are developers observing these requirements? 

    For Nairobi and Kiambu Counties, building plan approval is done online. This helps to reduce the chances of developers trying to use shortcuts for plan approvals and hence circumvent the bye laws set to ensure buildings are safe and comfortable for human habitation. Kajiado and Machakos counties, which surround the capital City, hence have a lot of construction going on, should follow suit and take in Online building plan approval processes, hence less chances for developers to build using shortcuts that are not vetted by County Planners.

     What should tenants look out for in- size of the living room,kitchen,rest rooms , bedroom(s)

    Tenants should look out for well lit and well ventilated rooms. The rooms should have large windows opening into the outside. The windows should have at least 5 meters of free set backs until where the opposite wall begins. This is to ensure adequate light and natural ventilation for good internal air quality.

      How should the rooms be ventilated, and is this being observed?

    Kenyan Building Code emphasizes on natural ventilation. THere i a way that buildings can be designed to allow for cross ventilation , ensuring the occupants are comfortable.

    Some developers have circumvented this County planning department vetting. Those who have circumvented this and went ahead to build poorly ventilated buildings usually have a problem with tenancy.They end up charging lower rent than the surrounding buildings and the tenants keep moving out, resulting in lower occupancy rates.

    Impact of poor ventilation.

    The cost of lighting the public spaces, corridors and stairs goes high since lights have to be on during the day. This eats up onto the developer’s rental income.

    The poorly ventilated houses are uncomfortable to tenants so tenants keep moving out and demanding for lower rents. Tenants also risk pulmonary diseases especially to the kids.

    What should developers do to ensure there is even distribution of light, fresh air and proper ventilation, especially on ground and first floor units?

    Developers need to identify properly qualified Architects to design their buildings. After this, Developers need to ensure they follow the right method for County planning approvals where their buildings are double-checked to ensure quality of occupants, which in turn will result to better rental income for the developers.

    What should a developer consider when developing rentals, to ensure that they input aspects of proper living conditions and get the return on investment they opt for?

    Developers need to ensure their buildings are designed targeted to the right clientele, whether low, middle or high income clientele. Once buildings are designed to be comfortable for human habitation, this will automatically result into good return on investment for the developer.

    Architect Francis Gichuhi kaamau.

    info@a4architect.com

    0721410684

  • Column, Beam, Slab Concrete costs for multi storey buildings.

    Reinforced Concrete Structures.

    Columns.

    Assuming a standard column width of 350mm by 350mm by 2.8m height, the volume will be 0.34m3, costing kes 7,000 including reinforcement.

    Floor Slab.

    Assuming a 150mm thick reinforced floor slab, this will cost kes 4000 including reinforcement.

    Beam

    Assuming 2 m length of beam, 350mm by 350mm cross section, this will cost  kes 5,000 inclusive of reinforcement.


    Total cost for 1m2 of building will therefore be kes 16,000 for the structural frame using reinforced concrete.


    Using Pre Engineered Steel Structure.

    In Pre Engineered steel structures building frame, the columns and beams are made of steel.

    The World Trade Centre Building in USA had a column and beam structure made of steel as opposed to the usual structures in Kenya which are mostly made of concrete reinforced with steel bars.

    This structural frame costs kes 10,000 per m2 without the floor concrete slab. If the floor slab is added, the cost comes to approximately kes 13,000 per m2, which is slightly cheaper than reinforced concrete frame.


    This pre engineering building is slowly gaining traction in Kenya with the completion of Lenana Hotel in Nairobi.


    Aslo, completion of the Sifa Towers in Hurlingham has brought the use of Pre Engineered buildings into the Nairobi limelight.


    For more details on Pre Engineered steel buildings , feel free to contact us below.


    Architect Francis Gichuhi kamau.

    info@a4architect.com


  • 9.5 Acres Malindi for Sale. Beach front.

    9.5 Acres Malindi for Sale. Beach front.


    Kes 12.5m per acre.

    Located approx 5 kms from Malindi Hospital on Casuarina road 10 mins from Malindi Town centre on graded murram road whose tarmacking has been approved
    Measures 9.5 acres (3.8Ha)
    Leasehold from 01.10.1991; user is residential
    1st row cliff NOT sandy beach, however, when tide is out there is access to large sandy beach as well as caves and coves
    1/2 km from Mayungu fishing village/Mayungu beach
    Neighbours include Children’s Orphanage, Medical Centre, Kivulini Hotel, Malaika Villas among a host of others.

    Email. info@a4architect.com

  • Ngong. House for Sale. 3 bd. All ensuite. 13m

    Bedrooms 3 . All enSuite, with  garage, sq, store, solar for back-up, perimeter fence.Asking 13m.

    email info@a4architect.com